Construction of a magpie trap
Check out our instructions and diagram for making a magpie trap. Find out more about how to catch and care for magpies in a Larsen trap.
The timber and dimensions given below are guidelines only. We've tried to keep the trap as light as possible, and construction costs to a minimum. You can reduce the cost even further by using material you already have available, such as sawn fence battens for the frame.
The timber specified for our example trap is 150 mm x 25 mm nominal, ripped into three equally sized pieces. Most timber retailers will do the ripping for you if you don't have the tools to do it yourself. You will need approximately 12 lineal or running metres to complete the trap.
We've given you two different ways of making a trapdoor for your larsen trap. Choose the option that best suits your needs.
Your trap needs to have at least two compartments, one for the decoy bird and one as a trap. You can extend this design to make four compartments, one for the decoy bird and three as traps.
The cage
- Cut to length:
- 4 pieces 800 mm long
- 12 pieces 400 mm long.
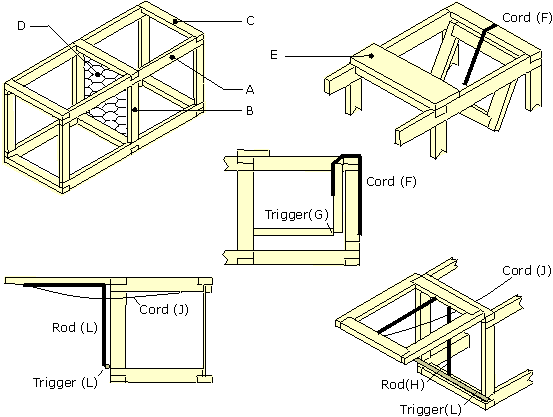
- Mark the four side pieces (A) to receive the cross rails (C) and check out.
(The check outs make assembly easier and more rigid. If you are using more substantial timber, such as battens, a butt joint will do). - Nail top and bottom side pieces (A) to uprights (B) to complete two side frames.
- Nail cross rails (C) to check outs to complete the cage.
- Fix netting (D) across the central partition.
- Cover the remainder of the cage (except the door opening) with netting.
The doors
Choose between making a 'top trap door' or 'end trap door' - you only need one. Make sure there's a minimum clearance of 12 mm between the trap door and the cage frame. This stops the door from catching the edge of the cage.
1. Top trap door
A 'top trap door' should be about two thirds of the length of the opening. If the trap door is too long, the bird you are trying to trap may stop it from springing shut. The trap door may even force the bird out of the trap.
- Hinge the door to one end of the cage with two butt hinges. Use freely operating hinges, such as 65 mm galvanised butt hinges, or use a short strip of leather or similar material on each side. The door should be able to freely spring shut. If you've used rigid netting for your trap door, secure it using small fencing staples (partially driven).
- Fix a 150 mm wide board (E) across the top of the cage as a door stop. Make sure the door stop is fixed securely, so it can take the force of the door closing against it.
- Make two wire hooks, crimp them onto a piece of stretch cord (F) and hook them onto the door netting and the cage and netting as illustrated.
- Make the trigger (G) for the trap using two pieces of timber approximately 25 mm x 25 mm (see illustration below). This is about the smallest cross-dimensional size that will support itself without ‘folding’ prematurely.
- Place a piece of dowel or a small circular branch or twig across the central netting to support one end of the trigger and to ensure that it trips easily.
- Set the trigger as low as possible on the door rail to make it as sensitive as possible. Entice birds onto the trigger using a piece of bread. The trap is sprung when a bird jumps down onto the trigger.
2. End trap door
Make an 'end trap door' as light as possible. The lighter it is, the lighter the trigger can be set and the less weight will be required to trigger it. Rigid netting, such as that used to make fitch cages, is ideal for making 'end trap doors'.
- Hang the door as for the top trap door (above). If you're using rigid netting as a door, use partially driven staples for hinges. Make sure your door can swing freely.
- Bend a piece of 6-8 mm steel rod (H), such as an old electric fence standard, at a right-angle and fix to both door rails with small staples. Ensure your trap door will work effectively by making sure the bottom end of the rod is well clear of the cage bottom rail, and the door clears the central netting as it closes.
- Make two wire hooks, crimp them onto the stretch cord (J) and hook them onto the wire netting across the top of the door and the top of the cage as illustrated.
- Make the trigger (I) out of dowel or a small diameter branch and set it across the end of the cage as illustrated. Make sure you set the trigger to be as light as possible.
When a bird stands on the rod, it triggers the trap and the door slams shut.


To ask for help or report a problem, contact us
Tell us how we can improve the information on this page. (optional)